Showing posts with label Home Projects. Show all posts

Tuesday, 9 December 2014

9 Amazing Things to do With Duct Tape

Duct tape is the tape of a thousand uses, but since we don't have all day we've come up with 9 uses you can do today. Got any you think we should add? Just comment below!

Hem Your Trousers


It’s an unwritten law that you notice your hem on your skirt or trousers has come loose just as you’re about to leave the house, and then have to spend time hunting for a needle and thread to repair it. Duct tape works really well as an emergency hem repair kit, and is especially good on thick fabrics like denim which are tough to sew through.

Get Crafty


Duct tape makes the perfect crafting material as it can be bent and shaped without losing its structure. Duct tape flowers are particularly effective and easy to make, and if you use a variety of different colours or patterned tape, you can create a whole bouquet of blooms for very little cost. Duct tape can also be wound into spirals to make beads, or fashioned into ties, flip-flops and many other sorts of accessories.

Emergency Key


If you’re prone to forgetting your keys or locking yourself out of the house, duct tape can be used to keep a key safely, somewhere that nobody would think to look for it. Tape a spare house key to the inside door of your car, or to the underside of a windowsill at the back or rear of the property.

Hammock


We all know that duct tape is very strong, so why not exploit its strength and make yourself a unique hammock to while away those summer afternoons? All you need apart from your rolls of duct tape is a couple of lengths of strong wood and some rope. Join the two lengths of wood together using long strips of tape, then weave tape backwards and forwards to form the mesh of the hammock.

Learn how to make your own duct tape hammock with this guide on Instructables.

Leaks


It’s not a permanent fix, but when push comes to shove you can use a roll of duct tape to repair a split in the hull of a small boat or canoe. It can also be used to patch up beach balls, lilos and other inflatables. Duct tape works well as a temporary measure and may extend the life of your rubber ring until the end of your holiday, but shouldn’t be relied on as a permanent repair.

Get Rid of Warts


The traditional treatments for getting rid of warts usually use chemicals to dissolve the wart or high pressured gas to freeze it off. A less high-tech, but equally effective method involves putting duct tape over the wart for seven days, removing the tape and rinsing the finger, then repeating until the wart has disappeared.

Waxing


If you can’t afford a trip to the beauty salon to have your legs and bikini line waxed, it is possible to do the job yourself with some duct tape. It takes some practice to get the technique of ripping the strips of tape off quickly, and tape isn’t as kind to your skin as the professional wax strips. It’s not the best way of waxing, but it will do at a push. Oh, and by the way - it will probably hurt like hell!

Emergency Plumbing Repairs


Burst pipes are a nightmare, and if you have sprung a leak somewhere in your home, some duct tape fixed over the leaky part will minimise damage to your property until the professionals can get there to do the job properly. Make sure to check if the duct tape is waterproof first though. You can by waterproof duct tape that you can keep in a cupboard for emergencies.

Kids Dressing Up


Wrapping your kids up in duct tape isn’t recommended (as funny as that image above is, don't do it!), but a roll of silver duct tape can instantly transform some plain cardboard into a sword, shield, suit of armour or a robot costume. It’s an easy way to make cheap and effective Halloween costumes.

Mashable has 15 ways you can make Halloween costumes with duct tape.

You may wonder why taping windows up to prepare for a storm isn't on there. The fact is that it's a complete myth that it will do anything to prevent your window from shattering, so don't bother wasting time and effort doing it.

Friday, 25 April 2014

How to Make and Use a Jig


Jigs are, in essence, a template for your project. Jigs are an important tool for any woodworker to learn to make because they ensure your work is held accurately and safely. A jig is an essential part of your kit whether you want to make your own doors, windows, cabinets or any wooden object that requires accurate and repeatable cutting quickly.

You can build simple one-use temporary jigs for your current project or you can create complex jigs that last a lifetime for projects that you will continuously repeat. Whatever the purpose is for your jig, it will make your project is easier.

Making your jig


1. Choosing the right materials

Your material will depend on your jig’s purpose, but for most applications plywood and MDF and is sufficient. It is advised to choose wood that is already flat and straight to avoid spending time faffing around making the jig materials smooth and flat.

Hardwood is great for higher accuracy projects and for longevity.

2. What is the jig being used for?

Your project dictates which type of jig you need to build. Here are a few examples of Jig types:
·         Table saw jigs – the table saw is one of the most used and versatile woodworking tools in most workshops.
  • Panel cutting jigs
  • Feather boards – these can be used with a table saw or on a router table.
  • Table saw jointer jigs – a jointer is designed to provide a smooth, flat edge on one of the long edges of a board.
  • Band Saw circle cutting jig – perfect for producing smooth and circular pieces for small round table tops.
  • Circular saw measuring jig – great if you only have a circular saw and straight edge that can be clamped especially if you are away from your workshop.
  • Dovetail jigs
  • Tapering jigs
There are numerous step-by-step videos available on YouTube – one of my favourite jig making videos is ‘How to build a jig’ from the Yankee Workshop.

      3. How to secure your jig

Securing the various wooden parts of your jig together depends on how often it will be used and if you need to dismantle and change it. For example, if you are going to fasten using glue you need to ensure you have clamped the glued surfaces together straight away to prevent the two pieces from slipping out of place. For secure placement you should spread the glue, align the two pieces of wood, shoot brads or pin nails into the wood and then clamp firmly together for over half an hour.

Alternatively you can spring clamp the two pieces together in place, shoot in some brads to hold in in place and then screw in some wood screws.

4. Which clamps should you use?

Most jigs require the use of clamp to either hold down the jig onto the work bench or top hold down the work piece still within the jig. You just need to remember to choose a clamp that won’t get in the way of the blade. Here is a selection of clamps that are perfect to use with jigs depending on your requirements:

G clamps

G clamps are simple to use and are great at securing your jig still to your work bench. Heavy duty G clamps are very easy to use and adjust and provide ample clamping pressure.

Spring clamps

Spring clamps are suitable for quick and simple holding which requires low clamping forces. These are great for temporary clamping of a wooden piece, such as, when you are securing a stop block to your jig base whilst you shoot in your brads or nail pins.

Toggle clamps

There is a wide range of toggle clamp (see picture above of a  vertical Toggle Clamp) available on the market depending on your needs. There are horizontal handle toggle clamps that are perfect for products with height restrictions due to their low profile when fully locked in place. You can also purchase vertical Toggle clamps (their handles are vertical when clamped into position) and push-pull toggle clamps which are great for jigs that are being used vertically with presses. All you have to do is screw your toggle clamp onto your jig where you want the clamping pressure to be applied and away you go.

Thursday, 16 January 2014

The Amazing Wooden Cat Obstacle Course

I've had my cat since May last year. When we got him he was only a few weeks old, so that means he’s yet to have his first birthday. A combination of him being so young and the fact we've yet to get him neutered means that we haven’t let him outside yet. He’s been out in the back yard with us a few times, but only under supervision. Cars scare him too, so he’s stopped trying bolt out of the front door whenever we open it.

During the day he’s left on his own, where he has the run of the house aside from the living room (he has a habit of pulling the carpet up to such a degree that it blocks us from getting in the room). I do often wonder if he’s bored, but the little play cat house we bought him, his scratching post and the majority of his toys lie untouched. Yet put a box down and he can’t help but climb inside. He also has a fondness for going behind the TV, until he’s shouted at and runs off with a wail. So, what do you do to please a bored cat? I've been thinking about building some sort of project for him, which is when I came across this.


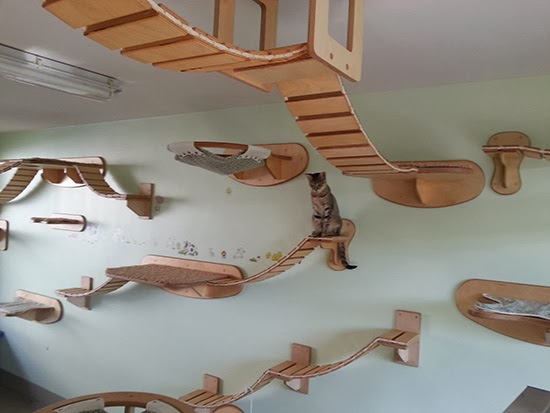
Designer Stefan Hofmann clearly doesn't have bored cats, because they've got the most impressive cat obstacle course I've ever seen to play around in. His creations have resulted in a line of cat climbing furniture that’s sold by German company Goldtatze, which translates to gold paw. I can see why they’d call it that, as I’d probably have to be earning quite a bit more to be buying such an elaborate play area for my cat. I'm not sure the landlord would appreciate it either, but let’s not ruin an impressive design by moaning.


Your cat can traverse walkways over molten pits of lava; dive across wall mounted perches situated hundreds of feet above a terrifying drop to into a dry canyon. Before long they’ll reach the birds nest, where they’ll disturb the birds and randomly chase them around the room for hours on end.


Ok, so not all of that is true but the obstacles are still pretty amazing. Each piece is custom built to your specifications, although if you don’t live in Germany then you’re probably going to have to fork out quite a bit for shipping. Or you could get into the DIY spirit and try building some of your own creations. At least your cat would thank you.

Well, when I say your cat will thank you it will probably just jump on to its new territory and promptly continue to ignore you until its feeding time or they want to use your lap as conveniently warm bed.

Here's a video of the cats enjoying their new roaming grounds.


Pictures via Haunspanther.com